一段時間沒有更新了
趁今天有空來補充一下 Uint Test 在實際開發中會需要使用到 Powermock 的場景
假設今天需要 mock 的對象只在 method 中使用
一般的 mock 做法是無法從外部引入
像這個例子,我們想要測試 Calculator ,這裡只有一個簡單的加法操作
在某個測試案例中,我們不想依賴 calc() 外部傳入的 param1 和 param2 對 Input 進行初始化
或不想回傳實際運算結果,而是強制指定 Output 的回傳內容1
2
3
4
5
6
7
8
9
10
11
12
13
14
15public class Calculator {
public int calc(int param1, int param2) {
Input input = new Input(param1, param2);
Output output = new Output();
addition(input, output);
return output.getResult();
}
private void addition(Input input, Output output) {
output.setResult(input.getParam1() + input.getParam2());
}
}
但 Input 和 Output 不是 Calculator 的 field 無法進行 mock
目前只能透過 Powermock 的方式,跨越次元壁強制注入
在此之前,先補上 Input 和 Output 的結構1
2
3
4
5
6
7
8
9
10
11
12
13
14
15
16
17public class Input {
private int param1;
private int param2;
public Input(int param1, int param2) {
this.param1 = param1;
this.param2 = param2;
}
public int getParam1() {
return param1;
}
public int getParam2() {
return param2;
}
}
1 | public class Output { |
這次改用 @RunWith(PowerMockRunner.class) 當測試的 Runner
因為指定了 @PrepareForTest(Calculator.class) , Calculator 是我們要測試的 class
Powermock 需要對它動一些手腳,我們才可以做到跨過次元壁對 Input 和 Output 做設置
想知道為什麼要加這些 annotation 可以去 google ,網路上一堆,就不在此解釋
這裡的重點是示範如何根據測試需求 Powermock Input 和 Output1
2
3
4
5
6
7
8
9
10
11
12(PowerMockRunner.class)
(Calculator.class)
public class CalculatorTest {
private Calculator calculator;
public void setup() {
this.calculator = new Calculator();
}
...
}
開始第一個測試
Powermock Input ,第 7 ~ 10 行與一般 mock 一樣的流程去 mock Input
重點是第 12 行, whenNew(Input.class).withAnyArguments().thenReturn(input)
再產生 Input Object 的時候,不管傳入任何參數,都指定回傳我們要的 input1
2
3
4
5
6
7
8
9
10
11
12
13
14
15
16
17
18
19
20
21
public void Should_GetResult300_When_PowerMockInputSuccess() throws Exception {
final int PARAM1 = 100;
final int PARAM2 = 200;
// given
Input input = PowerMockito.mock(Input.class);
PowerMockito.when(input.getParam1()).thenReturn(PARAM1);
PowerMockito.when(input.getParam2()).thenReturn(PARAM2);
PowerMockito.whenNew(Input.class).withAnyArguments().thenReturn(input);
// when
int result = this.calculator.calc(anyInt(), anyInt());
// then
verify(input, times(1)).getParam1();
verify(input, times(1)).getParam2();
assertThat(result, is(PARAM1 + PARAM2));
}
這個做法就可以讓我們專注測試 Input 的變化,而不受外部參數影響
在實際開發情況下 Calculator 的 calc() 這個 method 可能外面會包了好幾層
要透過外部一層一層傳入參數到 Input 不知道要花多少時間做調整
第二個測試與第一個測試實際上是一樣的
只是 .when(input.getParam1()).thenReturn(PARAM1) 改為 .doAnswer(invocation -> PARAM1).when(input).getParam1()doAnswer 這個在一般 mock 也很常用到,根據執行傳入參數來動態決定決定 return 的結果1
2
3
4
5
6
7
8
9
10
11
12
13
14
15
16
17
18
19
20
21
public void Should_GetResult300_When_PowerMockInputDoAnswerSuccess() throws Exception {
final int PARAM1 = 100;
final int PARAM2 = 200;
// given
Input input = PowerMockito.mock(Input.class);
PowerMockito.doAnswer(invocation -> PARAM1).when(input).getParam1();
PowerMockito.doAnswer(invocation -> PARAM2).when(input).getParam2();
PowerMockito.whenNew(Input.class).withAnyArguments().thenReturn(input);
// when
int result = this.calculator.calc(anyInt(), anyInt());
// then
verify(input, times(1)).getParam1();
verify(input, times(1)).getParam2();
assertThat(result, is(PARAM1 + PARAM2));
}
在目前的需求中使用測試一的寫法就夠了
那為什麼在這裡多提醒 doAnswer 的寫法呢?
因為實際開發中我們會用到 Powermock 的情況下, mock 的對象通常會是 static
像這種共用的 Object 和 method 傳入的來源特別雜
所以需要根據傳入的參數回傳不同的結果
此時 doAnswer 會比 thenReturn 和 doReturn 好用
第三個測試是強制設置 Output
用法與 Input 類似,第 10 行由 withAnyArguments 改為 withNoArguments
這裡演示沒有參數傳入的做法
第 11 行改用 thenAnswer ,這與 doAnswer 用法一樣,根據個人習慣或測試邏輯選一個用就好
這裡要注意第 14 行不可以傳入 anyInt() 不然會在 calc() 內部Input input = new Input(param1, param2) 初始化時發生錯誤
除非使用測試一和測試二的寫法 Powermock Input
這是一般寫測試的新手比較難注意到的地方
因為 Powermock 的錯誤訊息並不會提示這個問題
只能夠自己小心1
2
3
4
5
6
7
8
9
10
11
12
13
14
15
16
17
18
19
20
public void Should_GetResult1000_When_PowerMockOutputSuccess() throws Exception {
final int PARAM1 = 100;
final int PARAM2 = 200;
final int OUTPUT_RESULT = 1000;
// given
Output output = PowerMockito.mock(Output.class);
PowerMockito.whenNew(Output.class).withNoArguments().thenReturn(output);
PowerMockito.when(output.getResult()).thenAnswer(invocation -> OUTPUT_RESULT);
// when
int result = this.calculator.calc(PARAM1, PARAM2);
// then
verify(output, times(1)).setResult(anyInt());
verify(output, times(1)).getResult();
assertThat(result, is(OUTPUT_RESULT));
}
執行結果
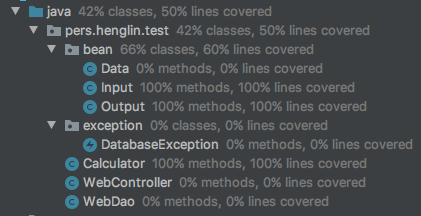
3 個測試都通過,與預計的結果相符合

Unit Test coverage 100%
今天 Unit Test 就談到這
實際開發中 Powermock 可以不使用就不要使用,因為它一但用不好
可能會影響到其他的測試案例….
但有時候卻是必要之惡,不用 Powermock 有些測試情況很難模擬和維護
最終造成測試 coverage 不夠完整
詳情可參考我的 github source code:
https://github.com/HengLin31/java-unit-test/blob/master/src/test/java/pers/henglin/test